

Fix It Yourself! |
 |
Cool, Easy, Fun |
How to Copy a Hard Drive to Another for Windows?
We often need to copy our current hard drive to another for backup and Windows Migration.
A clone is a direct copy, bit for bit, so that the data stored on the cloned drive is identical to the data on the original drive. From the operating system to the hidden directory files, from your desktop to the device drivers, everything is copied identically. Swap the old drive out for a freshly made clone and there should be no functional difference. You can also use the cloned drive in another PC, and aside from some potential missing drivers due to hardware differences, it should work just like your old system, making it an ideal backup in the event of a damaged PC.
For those who want to clone their drive directly, there are several tools available. DiskCloneWizardKit is one of them. DiskCloneWizardKit is a very powerful and easy-to-use software for hard drive copy. By using it, you can copy one of your PC's disk drive to another while your PC is running without extra LiveCD. Just follow wizard in 3 steps, you can copy a hard drive by yourself. It's has never been so easy! All 32-bit and 64-bit Windows XP /Vista /7 /8 are supported.
Firstly, please click the button below to download DiskCloneWizardKit.

After download, run the program named "DiskCloneWizardKit.exe", you can get the window below:
Nice face, isn't it? Just click the Start button.

Tips: DiskCloneWizardKit does not need installtion. You can use it directly after download.
Secondly, follow the wizard to copy your hard drive.
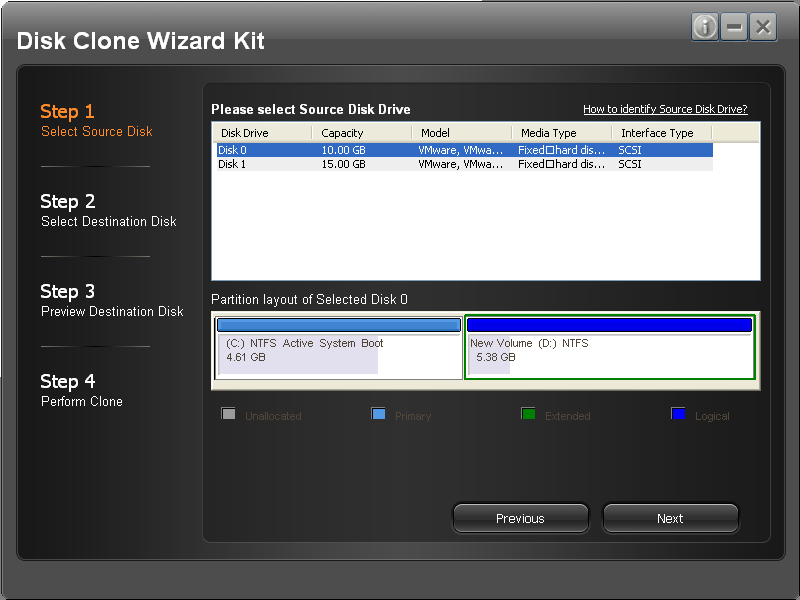
Step 1: Selete Source Disk Drive
Disk clone happens between two disk drives: source disk drive and destination disk drive. All data and files are copied from source disk drive to destination disk drive. Please make sure your PC at least have two hard drives attached. Here you select the source disk drive firstly. We have selected a disk drive for you by default. It's often the disk drive holding your Windows drive, such as C drive. Then, click the Next button to select destination disk drive.
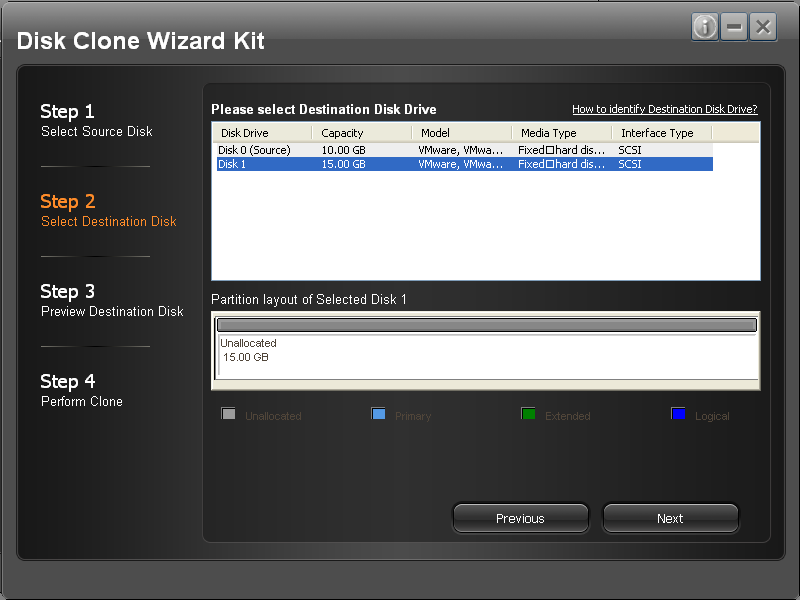
Step 2: Selete Desination Disk Drive
Destination disk drive is the disk drive to save data and files from source disk drive. You have selected one as the source disk drive in last step. If you PC has two disk drives attached, the other will be selected as destination one by default. The destination disk drive need not be partitioned or formatted, as all partition on it will be deleted and all data on it will be erased permanently. It can be a brandy new disk drive bought from Newegg or an old one I don't know where your get from. If it is an old one, be sure to check it for any useful data files, and backup these files; otherwise, they will be erased and lost forever.
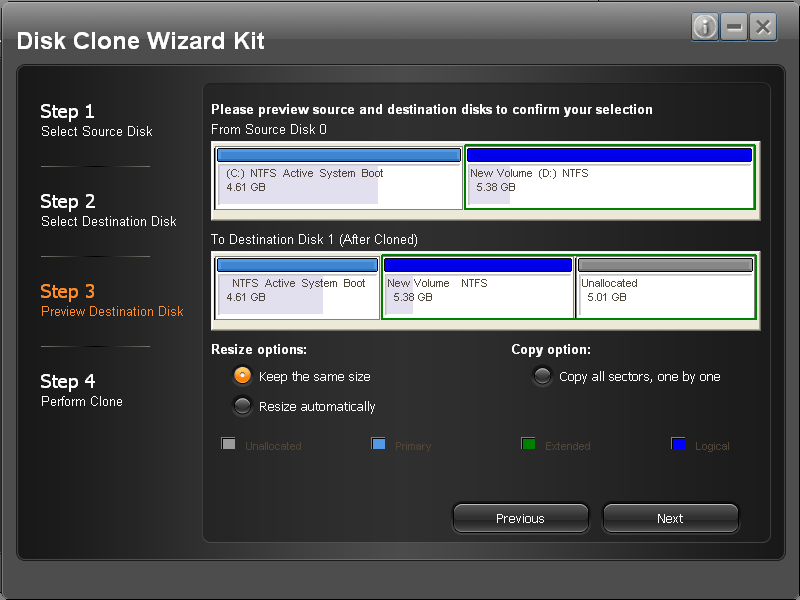
Step 3: Preview Desination Disk Drive
We often say, "What you see is what you get." In this step you can preview your destination disk drive. You can see what will the destination drive be look like before the clone process really starts. In the partition layout, you can know the number of partitions, each partition’s total size and used size, file system and etc.
Besides, we provide two clone options. One option is for partition size and it has two choices: make partitions on destination disk keep the same size with partitions on source disk OR adjust size of partitions on destination disk dynamically. We keep the same size by default. But when the capacity of destination is larger than source disk, some space on destination disk will be unused. What a waste of it! So if you want to make use of all space, you can select choice two. We increase the size of partitions on destination disk. When clone process finishes, you will find that partitions on destination disk are larger than partitions on source disk. Don't worry about your data. We just change the partition size; all files and data are the same.
Another option is whether to copy all sectors on source disk drive. We know that disk storage drive is consisted of tens of thousands of sectors. Each sector is 512 -byte-in-size. All files and data are stored on these sectors. When disk and partition is not full, files use not all sectors. For speed, we just copy the sectors used by files. But sometimes this way is not the most reliable. So we provide this option for some unreliable case. This option is off by default. You can turn it on when you need it.
In one word, these clone options are just some extra setting of disk clone. Don't be confused. If you don't know how to make a choice, just ignore them and use the default.
Step 4: Perform Clone
All correct choices are made. It's time to perform the clone operation. Disk Clone Wizard Kit copies each partition and its data from source disk to destination disk one by one and show you the progress and remaining time. All you need to do is wait a while and have a rest.
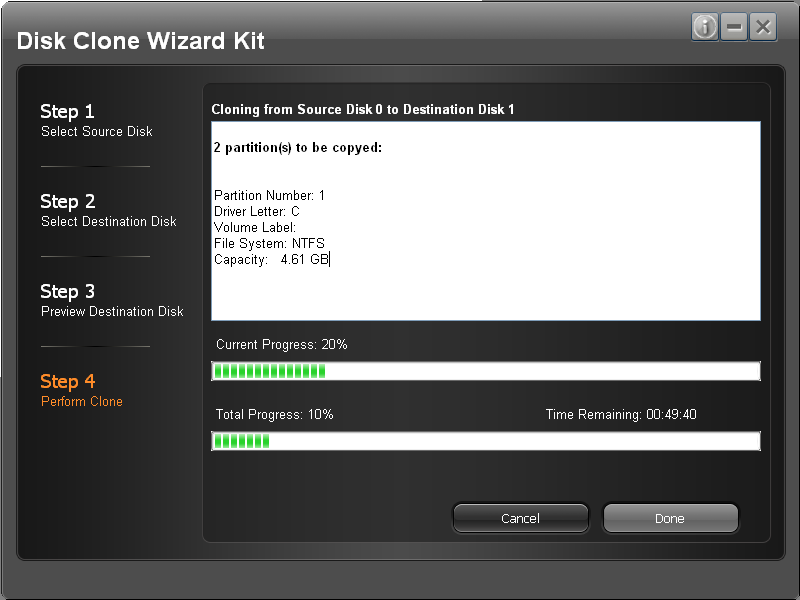
When progress shows "100% completed" and a dialog pops pup. Congratulations! Disk clone completes successfully.
What can DiskCloneWizardKit do?
Upgrade your hard drive to a large capacity HDD |
Migrate to a SSD without reinstalling Windows |
Transfer all of your hard drive data |
All 32-bit and 64-bit Windows XP /Vista /7 /8 are supported |
Support all kinds of disk drive: SSD, IDE, SCSI, SATA, USB, etc. |
Fast Download and Free Try!
Customers' Review
-
Disk Clone Wizard Kit
 Best I have tried, I replaced a 20gb on old laptop with 120 gb new one... went very smooth.
Saray.G (US) May 18, 2010
-
Made the cloning of my hard drive for the upgrade very simple.
C. Klug (US) June 3, 2010
-
This one made a very simple copy of my old drive that worked. I didn't need to re-install Windows 7 or anything else for that matter. It was as simple as making the clone, swapping out the drives and rebooting.
Roger (US) June 10, 2010
Product for Windows
